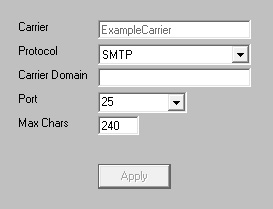
Creating an SMTP Carrier

<< Click to Display Table of Contents >>

Navigation:  PageGate Admin > Using the PageGate Admin > Carriers > Adding a Carrier >

Creating an SMTP Carrier

Previous pageReturn to chapter overviewNext page

Creating an SMTP Carrier

Top Previous Next

NOTE: Some components of the SMTP Protocol are controlled in the Global or Carrier Template Settings.


1)Open the PageGate Admin.


2)Right click on Carriers


3)Left click Add.


carrier


1)Name the Carrier what it needs to be (T-Mobile, Cingular, Verizon, etc).


2)Set the Protocol to SMTP.


3)The Carrier Domain field will insert whatever you type in after the information specified in ID/PIN field of the Recipient's settings. For example, if you've entered vtext.com as the Carrier Domain and a Recipient has an ID/PIN value of 7818290500, any time that recipient is messaged, PageGate will actually deliver the message to 7818290500@vtext.com


Enter the suffix of the devices you wish to send to. For example, for Verizon, you would use vtext.com or for AT&T you would use txt.att.net. For a full list of known Carrier Domains, please visit our support site: http://www.notepage.net/smtp.htm


4)Set the Max Chars to the maximum number of characters that should be sent in each SMTP message. If these messages are intended for celphones, set this value to 160.


1)Click on the dropdown arrow and select the Port.


2)Click on Apply.


Select the Advanced sub-section of the Carrier.


1)First select whether you would like SMTP/Email transactions for this carrier to be delivered via direct DNS connection request or by relaying these messages through an available SMTP server.


2)If relaying through a mail server that requires authentication credentials, please enter them in the username and password field.


3)Click on Apply.