PageGate has an HTTP data receiver (webdata.exe) that can receive input from nearly any API or protocol that offers an HTTP return like HTTP GET, HTTP POST and WCTP. This allows you to receive JSON, XML, HTML, WCTP and similar data submissions via HTTP/S request.
Received data doesn't need to conform to a single standard as it is fully processed with the GetASCII interface and, optionally depending on what you want to do with the received data, Filter Pack. If you want to receive multiple data formats, the Filter Pack isn't optional and you will need to implement a filtering system to tell PageGate what to do with each format received.
APIs and protocols that have the ability to send replies require that you provide a URL for the responses to go to. This means that, typically speaking, you will need to host PageGate's webdata.exe on an outward facing web server. Otherwise, the hosts won't be able to route the replies and responses to you.
webdata.exe is located in the PageGate program directory and MUST be copied to the webserver. If PageGate is not running on the web server hosting webdata.exe, you'll also need to share the directory on the webserver where webdata.exe is hosted to allow the GetASCII interface to monitor replies sent to the receiver.
Before you begin, you'll need to determine what you want to do with the replies.
Do you want to auto-respond to the person who sent the message to let them know that they shouldn't reply?
Do you want to scan the reply for keywords and keyphrases to determine what to do?
What you want to do will determine which parts of the received data need to be keyed on. Since each API has its own potentially unique structure, you'll need to know which flags, tags and fields are relevant.
Reply messages can also be fed through PageGate's Filter Pack to allow for conditional sending. For instance, with the PageGate's filter pack, you can tell PageGate to conditionally change who receives the message based on what the text in the reply is. As an example, you could configure a filter system so that any time the word lunch shows up in a reply message, that reply is sent to the cafeteria group instead of the general replies group.
You could configure a system where replies from a certain phone number will always be copied to certain recipients or groups.
You could configure a system where certain keywords or phrases are replaced with other keywords or phrases. For example, you could translate a code like PD4N in to 4th Precinct.
You could configure a system to describe every element I've just described all at once.
Step 1: Host webdata.exe on your web server
The first thing you'll need to do is host webdata.exe on your web server to provide the return URL for your API or WCTP host. The following steps are for IIS but this can be done with any web server suite.
1)Copy webdata.exe from the PageGate program directory to your server's scripting directory.
2)Open the IIS Admin and select the server object.
3) Open Handler Mappings.
4) Right click CGI-exe, left click Edit Feature Permissions
5) Check Execute.
6) Click OK.
7) Select the Server object again.
8) Open ISAPI and CGI Restrictions.
9) Right click in the box and select Add.
10) Specify the following:
ISAPI or CGI path: Specify the location of webdata.exe
Description: PageGate API Handler
Check 'Allow extension path to execute'
11) Click OK.
Step 1a: Share the folder webdata.exe is hosted in
If PageGate is not running on the server hosting webdata.exe, you will need to share the directory where webdata.exe is hosted to allow the GetASCII interface to parse replies.
Step 2: Configure GetASCII to process the received data
Each API and protocol will have a unique structure to the data returned to your server and you'll need to tell PageGate how to interpret the data and what to do with it in general.
If you own the GetASCII API, you can feed the reply information through that system for advanced processing. This allows you to modify message content and who the replies should go to but does not allow for conditional modification or conditional sending.
For example, you couldn't have the program scan the body of the message for a keyphrase, then completely change who the message is intended to go to based on it. That would require the PageGate Filter Pack.
To start, you'll want to configure an 'Advanced Polling' rule:
1)Open PG Admin.
2)Expand Interfaces - GetAscii - Settings - Advanced Polling
3)Click Files.
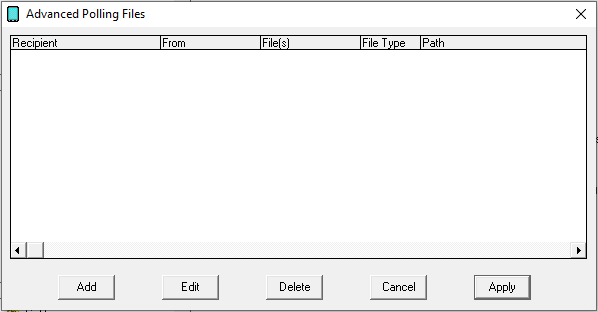
4)Click Add.
5)Specify the following and click Apply:
Recipient: *
From: Leave Blank
File(s): *.asc
Path: The path to the folder webdata.exe is stored in on the web server.
Example: \\WebServer01\pgscripts\
File Type: When using a filter script, set this to Standard.
When not using a filter script, set this to Custom
NOTE: If you will be implementing a filtering system, you will do so at this point and will not need to go through the remaining steps. For more information, please see PageGate's Filter Script documentation.
6)Go to Interfaces - GetAscii - Settings - Advanced Polling - Record
7)Specify the following and click Apply:
Start Pattern: *
Start Offset: 0
End Pattern: ~
End Offset: 0
8)Go to Interfaces - GetAscii - Settings - Advanced Polling - Recipient. This section tells PageGate where in the data to look for the recipient or group this reply should go to.
9)Select 'Dynamic Recipient' and configure the parameters.
For example, let's say you're working with the WCTP protocol and want to auto-respond to the person who sent the message. In WCTP, you can key off of senderID="Value".
As another example, let's say you're receiving an XML form and one of the tags will determine who needs to receive the reply. You would key off of <XML Tag>Value</XML Tag>.
Start Pattern: This value determines the first character in the recipient block. For example, if you're working with WCTP and want to key off of senderID="Value". You would use senderID=" as the Start Pattern.
As another example, if you're working with XML and want to key off of <XML Tag>Value</XML Tag>. You would use <XML Tag> as the Start Pattern.
Start Offset: The number of characters in the start pattern.
End Pattern: This value determines the last character in the recipient block. For example, if you're working with WCTP and are using senderID=" as the Start Pattern, you would use " as the End Pattern.
As another example, if you're working with XML are using <XML Tag> as the Start Pattern, you would use </XML Tag> as the End Pattern.
End Offset: The negative value of the number of characters in the End Pattern. Examples: -1, -10, etc |
10) Go to Interfaces - GetAscii - Settings - Advanced Polling - Sender. This section tells PageGate where in the data to look for the sender value.
11) For most implementations, you can select 'Static Sender' and specify a sender value.
However, if the sender's name will be contained in the data read, you can select 'Dynamic Sender' and parameters are configured similarly to the recipient section.
Start Pattern: This value determines the first character in the sender block. For example, if you're working with WCTP and want to use the value in senderID="Value". You would use senderID=" as the Start Pattern.
As another example, if you're working with XML and want to key off of <XML Tag>Value</XML Tag>. You would use <XML Tag> as the Start Pattern.
Start Offset: The number of characters in the start pattern.
End Pattern: This value determines the last character in the sender block. For example, if you're working with WCTP and are using senderID=" as the Start Pattern, you would use " as the End Pattern.
As another example, if you're working with XML are using <XML Tag> as the Start Pattern, you would use </XML Tag> as the End Pattern.
End Offset: The negative value of the number of characters in the End Pattern. Examples: -1, -10, etc |
12) Go to Interfaces - GetAscii - Settings - Advanced Polling - Message. This section tells PageGate what in the data should be considered the message and also allows for basic reformatting of messages.
13) Select 'Dynamic Message' and configure the parameters. If you want everything in the received data to be considered the message, you would use a Start Pattern of * and an End Pattern of ~.
Start Pattern: This value determines the first character in the message block. For example, if you're working with WCTP and want to use the value in the <wctp-Alphanumeric> tag, you would use <wctp-Alphanumeric> as the Start Pattern.
As another example, if you're working with XML and want to key off of <XML Tag>Value</XML Tag>. You would use <XML Tag> as the Start Pattern.
Start Offset: The number of characters in the start pattern.
End Pattern: This value determines the last character in the sender block. For example, if you're working with WCTP and are using <wctp-Alphanumeric> as the Start Pattern, you would use </wctp-Alphanumeric> as the End Pattern.
As another example, if you're working with XML are using <XML Tag> as the Start Pattern, you would use </XML Tag> as the End Pattern.
End Offset: The negative value of the number of characters in the End Pattern. Examples: -1, -10, etc |
The lookup table enables PageGate to perform basic search and replace commands. This allows you to interchange or translate values as needed.
To enable this feature, check Use Lookup Table and click Edit Table.
For more information, please see the lookup table section of the documentation.